How can we help?
Browse topics to learn how Docubark works, or search for what you need.
New to the terminology? See the TPRM glossary.
Account & Access
Creating your account
Sign up for Docubark with your email in about a minute.
You can create a Docubark account with your work email and a password, or with your Google or Microsoft account. This walks through email sign-up.
Sign up with email
- Go to the sign-up page.
- Enter your work email, full name, and a password of at least 8 characters, then confirm the password.
- Click "Create account".
- Docubark emails you a 6-digit code — enter it on the verification screen to activate your account (see Verifying your email).
Prefer single sign-on?
You can skip the password entirely and sign up with Google or Microsoft instead — see Signing in with Google or Microsoft.
Verifying your email
Confirm your email address with the 6-digit code.
After you sign up with email, Docubark sends a 6-digit confirmation code to make sure the address is really yours.
Enter your code
- Open the email from Docubark and copy the 6-digit code.
- On the "Verify account" screen, enter your email and the code.
- Click "Verify". Once verified, you'll be taken to sign in — or straight into the app if you're already signed in.
Signing in
Log in to Docubark once your account is set up.
Once your account is active, sign in from the Docubark login page to reach your dashboard.
Sign in with email and password
- Go to the sign-in page, or click "Log in" from docubark.com.
- Enter your email and password and submit.
- If prompted, enter the one-time code Docubark emails you to complete sign-in.
- You'll land on your Vendors dashboard.
Signing in with Google or Microsoft
Use single sign-on instead of a password.
Prefer not to manage another password? You can sign up and sign in with your Google or Microsoft account. It works from both the sign-up and sign-in pages.
Use single sign-on
- On the sign-up or sign-in page, click "Google" or "Microsoft".
- Choose your account and approve the permission prompt.
- You'll be signed straight into Docubark — no separate password or email verification step needed.
Resetting your password
Recover access if you forget your password.
Forgot your password? You can reset it yourself from the login page — no need to contact support.
Reset your password
- On the sign-in page, click "Forgot password".
- Enter your email and submit. Docubark emails you a 6-digit reset code.
- On the reset screen, enter the code, a new password of at least 8 characters, and confirm it.
- You'll be signed in automatically with your new password.
Creating Assessments / Questionnaires
Creating controls
Add the controls and questions your assessments are built from — manually or by import.
Controls are the building blocks of an assessment — each one holds the questions you evaluate a vendor against. You can add them one at a time or import them in bulk from a spreadsheet.
Add a control manually
- Go to Controls under Assessments.
- Click "Add Control", enter a control name, and confirm to create it.
- Open the new control and add your questions, answer options, and scores.
Import controls from a spreadsheet
- On the Controls page, click "Import".
- Download the template and fill in your controls and questions.
- Drag in your Excel file — .xlsx, .xls, or .xlsm, up to 10MB — and upload.
Importing controls from the template
How to fill out the downloadable Excel template — with examples.
You can bulk-create controls by filling out Docubark's Excel template. Here's exactly how it works, with examples.
Get the template
- Go to Controls under Assessments and click "Import".
- Click "Download Template" to get the Excel file, then fill it in.
How the template is laid out
The template is turned on its side: the field labels run down column A, and each control goes in its own column — B, C, D, and so on. So one column = one control. Fill column B for your first control, column C for the next, and so on.
| Row (in column A) | What to put in the control's column |
|---|---|
| Control Name | Required. The control's name. A column with no name is skipped. |
| Rubric Title / Max Points / Rubric Content | Fill these only for rubric scoring (see below). Leave blank for point-per-question scoring. |
| Min / Max Effective Value | Score range for the Effective (green) band. Optional — defaults to 75–100. |
| Min / Max Needs Improvement Value | The Needs improvement (yellow) band. Optional — defaults to 40–74. |
| Min / Max Ineffective Value | The Ineffective (red) band. Optional — defaults to 0–39. |
| Question 1 … Question 30 | Four rows per question (content, type, options, points), repeating down the column. |
Example — a rubric-scored control
Fill the rubric rows and leave the question rows blank. The reviewer scores the whole control against your rubric. See Rubric scoring.
| Row (column A) | Column B (this control) |
|---|---|
| Control Name | Access Control |
| Rubric Title | Access control maturity |
| Max Points | 10 |
| Rubric Content | Score 8–10 if MFA is enforced everywhere and access is reviewed quarterly; 5–7 if partially; 0–4 if not. |
| Min / Max Effective Value | 8 and 10 |
| Min / Max Needs Improvement Value | 5 and 7 |
| Min / Max Ineffective Value | 0 and 4 |
Example — a point-per-question control
Leave the rubric rows blank and fill the question rows instead. Each question takes four rows. See Point-per-question scoring.
| Row (column A) | Column B (this control) |
|---|---|
| Control Name | Encryption |
| Question 1 | Is data encrypted at rest? |
| Question 1 Type | select |
| Question 1 Options | *Yes|No |
| Question 1 Points | 10|0 |
The Options and Points shorthand
- Type is text, select, or multiselect. "text" is a free-text answer — leave its Options and Points blank.
- Separate options with a pipe: "Option A|Option B|Option C".
- Put an asterisk before the good answers: "*Yes|No" means Yes is acceptable and No is a bad answer (bad answers show in red).
- Points apply to select questions only — one integer per option, in the same order, separated by pipes.
| Field | Example | Reads as |
|---|---|---|
| Options | *Full encryption|*Partial|None | Full and Partial are acceptable; None is a bad answer |
| Points | 10|5|0 | Full = 10, Partial = 5, None = 0 |
Upload it
- Save the file as .xlsx.
- Back on the Controls page, click "Import", drag your file in, and upload.
- Docubark confirms how many controls and questions it imported.
Creating SME groups
Set up groups of subject matter experts to review assessment areas.
An SME group is a set of subject matter experts responsible for a specific area of an assessment. Attach a group to a builder tag so the right people are looped in automatically.
Create an SME group
- Go to SME Groups under Assessments.
- Create a new group and give it a name and description.
- Add members by name and email, or pick existing teammates.
Rubric scoring
Score a control against an overall rubric instead of individual questions.
Rubric scoring lets a reviewer score an entire control against a written rubric, rather than tallying individual questions. It suits judgment-based areas where an overall assessment is more meaningful than a checklist.
How it works
- Each rubric control has a rubric title, the rubric guidance text, and a maximum number of points.
- The reviewer reads the evidence and assigns a score up to the max points.
- That score maps to an effectiveness band — Effective (green), Needs improvement (yellow), or Ineffective (red) — based on the ranges you set.
Point-per-question scoring
Score a control from the answer options on each question.
With point-per-question scoring, each question's answer options carry their own point values, and the control's score is the points earned versus the points available.
How it works
- Every answer option has a point value; you pick the option that matches the vendor's answer.
- Options can be flagged as a "bad answer" (shown in red) to mark a weak choice.
- Informational or N/A options can be excluded from the denominator so they don't count toward the maximum.
- The control score is points earned ÷ points available, shown as a percentage.
How assessment scoring rolls up
How question and category scores combine into one assessment score.
An assessment's overall score is a straightforward roll-up of the points earned across all of its scored categories — whether those categories use rubric or point-per-question scoring.
From questions to categories
Within a category, each scored question contributes its earned points and its available points. N/A answers and excluded (informational) options are skipped so they don't distort the result. The category score is earned ÷ available — shown as a percentage and mapped to an effectiveness band.
From categories to the assessment
The overall score sums earned and available points across every scored category, then divides. There's no separate per-category weighting — each category contributes in proportion to its points, so a larger category naturally counts for more. When a ticket has several assessments, the same roll-up combines them into one percentage.
Effectiveness bands: a deeper dive
How a score percentage becomes Effective, Needs Improvement, or Ineffective — and how to tune the ranges.
Every scored control produces a percentage, but a number on its own doesn't tell a reviewer whether a vendor is doing well. An effectiveness band translates that percentage into a plain-language verdict and a color. In Docubark these live on each control as its Rubric Range, and there are three of them.
The three bands
| Band | Default range | Color |
|---|---|---|
| Effective | 75–100% | Green |
| Needs Improvement | 40–74% | Yellow |
| Ineffective | 0–39% | Red |
The bands must be contiguous and cover the whole 0–100% scale, with no gaps or overlaps. So Ineffective always starts at 0, Effective always ends at 100, and each band begins one point above where the one below it ended (with the defaults: Ineffective ends at 39, Needs Improvement runs 40–74, Effective picks up at 75).
Where you set them
- In the left sidebar, go to Assessments → Controls.
- Open the control whose rubric you want to tune and find the "Rubric Range" panel — three colored boxes labeled Effective, Needs improvement, and Ineffective.
- Set the Min value and Max value for each band, then save. Because ranges live on each control, different assessment areas can use different thresholds — you might hold an encryption control to a higher bar than a policy control.
Where the bands show up
- The Control Effectiveness scorecard on the vendor and ticket — how many controls landed in each band, plus the overall percentage.
- The assessment result page and each category/question card, color-coded green, yellow, or red.
- The printed assessment report, with per-category and summary counts by band.
Bands vs. the overall Control Effectiveness score
Each individual control gets its band from the ranges above. Separately, the vendor's overall Control Effectiveness is a single percentage rolled up across all rubric categories — and the color on that overall number uses a fixed, built-in threshold (green at 85% and up, yellow from 70%, red below), not your per-control 75/40/0 ranges. So don't be thrown if an overall score of 78% shows yellow even though a single control at 78% reads as Effective — they're measured by different rules on purpose.
How bands relate to residual risk
The overall Control Effectiveness feeds residual risk: Docubark turns it into a vulnerability figure — roughly (100 − control effectiveness) × a modifier — which drives how often a loss is expected and, in turn, the vendor's residual risk and Annual Loss Expectancy. That's a different idea from the dollar-based risk-level tiers you configure under Residual Risk. Effectiveness bands describe how well controls scored; residual-risk tiers describe how much risk, in dollars, remains.
Vendors & Tickets
Creating a vendor
Add a vendor so you can track and assess it.
Adding a vendor creates the record you'll open tickets and run assessments against.
Add a vendor
- Go to Vendors and click "Add Vendor".
- Enter the vendor name (required). Optionally add the product, URL, vendor type, and a short description of the use case.
- Click "Save" — the vendor appears in your list, ready for tickets and assessments.
Creating a ticket from a vendor profile
Open a ticket directly on a vendor to start a piece of work.
A ticket tracks a unit of work on a vendor — like a review or a reassessment. The quickest way to start one is from the vendor's profile.
Create a ticket
- Open the vendor and go to its Tickets tab.
- Click "Create Ticket".
- Choose a ticket type (required) and, optionally, a department, then click "Create".
- Docubark opens the new ticket so you can run an assessment and track progress.
Creating a ticket from the intake form
Collect vendor requests and convert them into tickets.
The intake form lets people request a vendor for review. Submissions arrive as intake tickets that you convert into a vendor and ticket.
Share the intake form
- Go to Intake → Form and copy your intake form URL.
- Share the link with anyone who requests new vendors.
Convert a submission to a ticket
- Go to Intake → Tickets to see submitted intakes (status "Intake Review").
- Open a submission to review its answers.
- Click "Convert" and choose "Create New Vendor" or select an existing vendor.
- Confirm — Docubark creates the vendor and ticket from the intake.
Running an assessment in a ticket
Manually choose a builder tag and run its assessment.
Inside a ticket you can run an assessment against any builder tag you choose — useful when you want to pick the assessment yourself rather than rely on intake mapping.
Run an assessment
- Open the ticket (or vendor) and go to the Assessments tab.
- Click "Start Assessment" to open the Run an Assessment wizard.
- Choose the builder tag: pick from "Your Team's Assessments", or toggle "Show Standard Assessments" for the standard ones, then click Continue.
- Pick an Answer Mode — "AI Assistant" (then select the vendor files to analyze) or "Manual Entry" — and click Continue.
- Click "Run Now".
Re-running an assessment (delete and recreate)
Start an assessment over when documents change — delete it and add it back.
When a vendor sends updated documents — or anything else changes — you may want to run an assessment again from scratch. Docubark doesn't reset an assessment in place; instead you remove it from the ticket and add it back, which creates a fresh copy to run against the current documents.
Delete the existing assessment
- Open the ticket. In the Assessment Overview panel, click "Edit Assessments".
- In the Manage Assessments dialog, uncheck the assessment's tag (for example, the "SaaS" vendor type). As the dialog warns, "Removing a Tag Will Delete the Associated Assessment!" Then click "Update".
- If that assessment was already worked on, a warning lists what will be permanently deleted. Click "Yes, delete these assessments" to confirm.
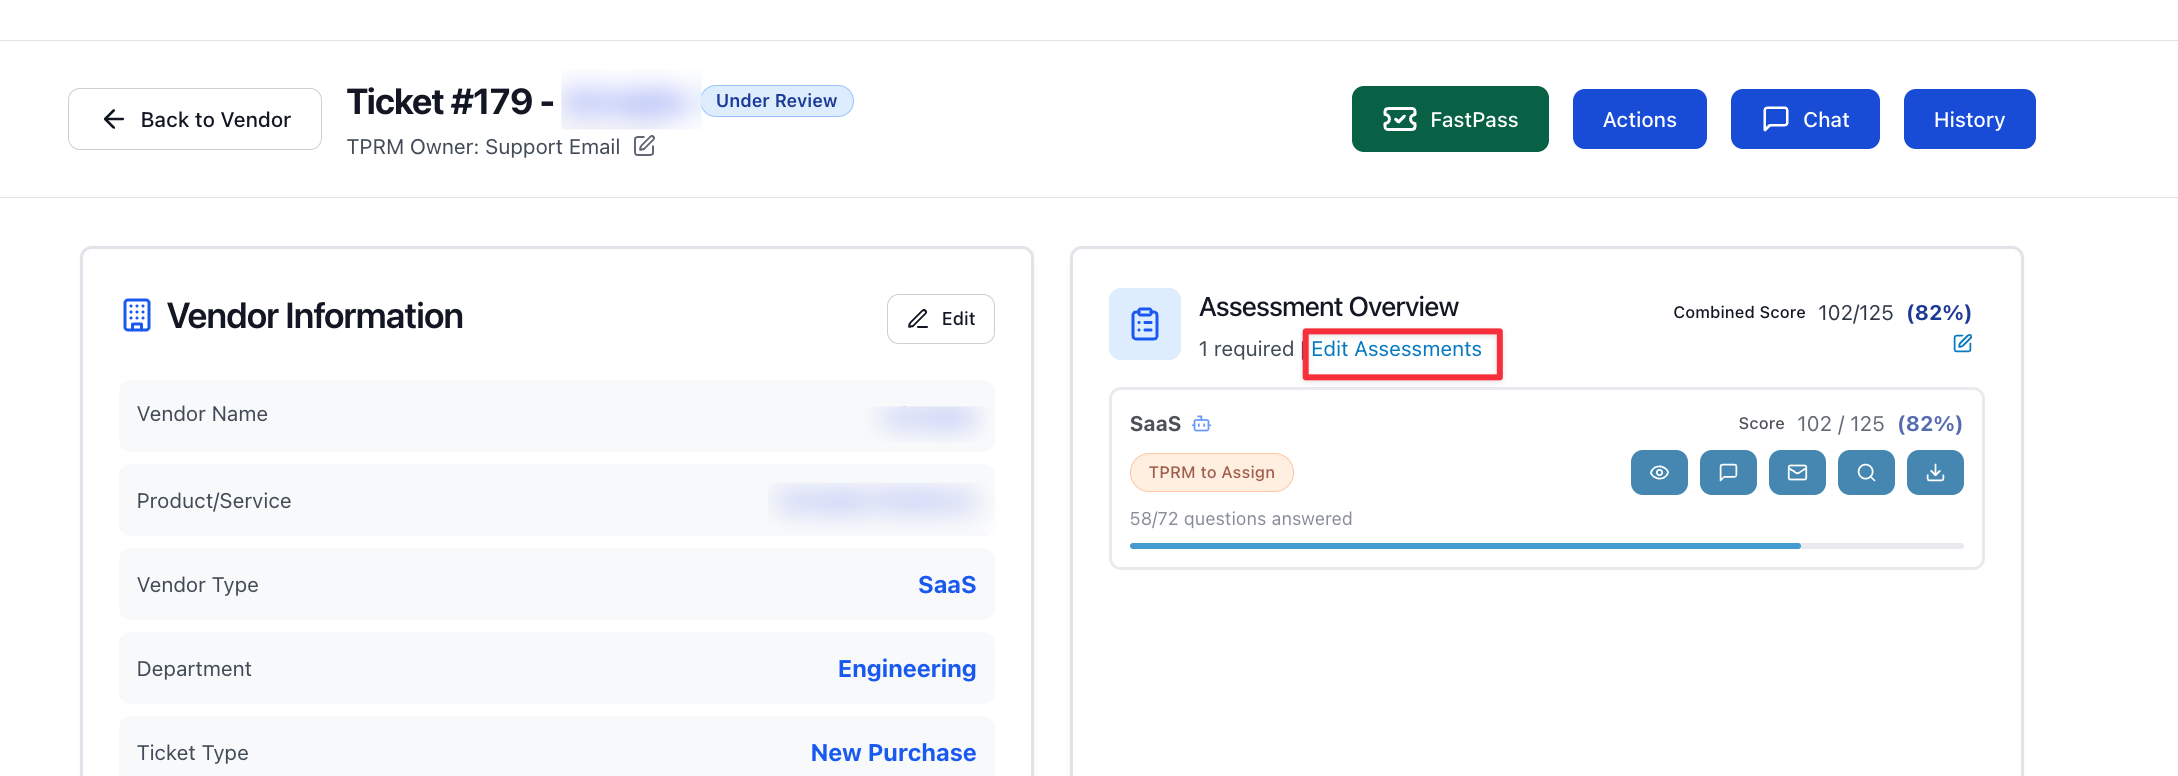
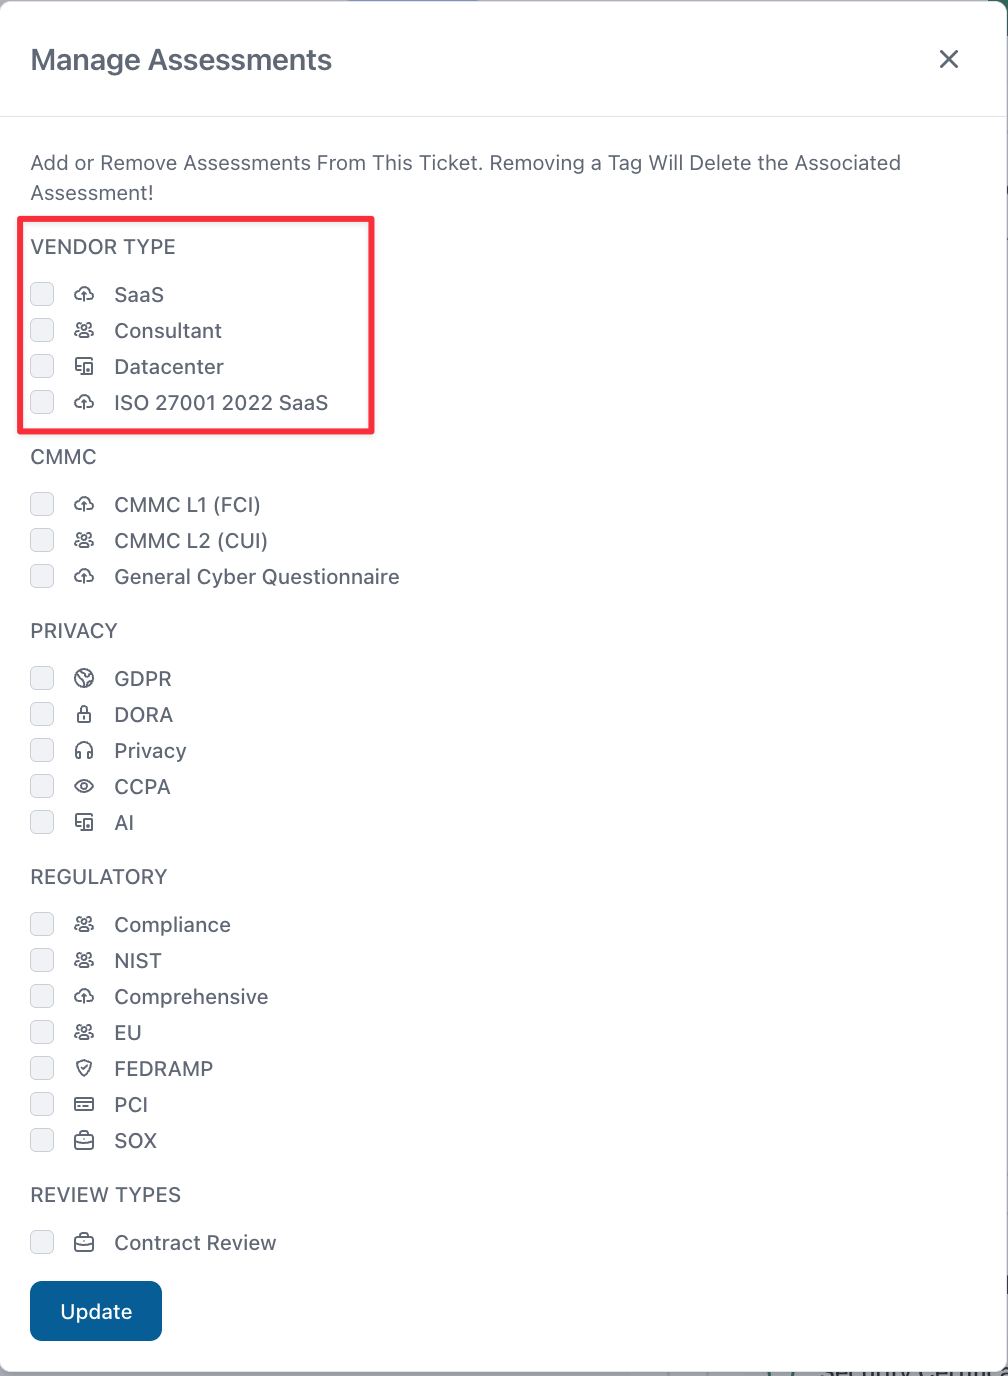
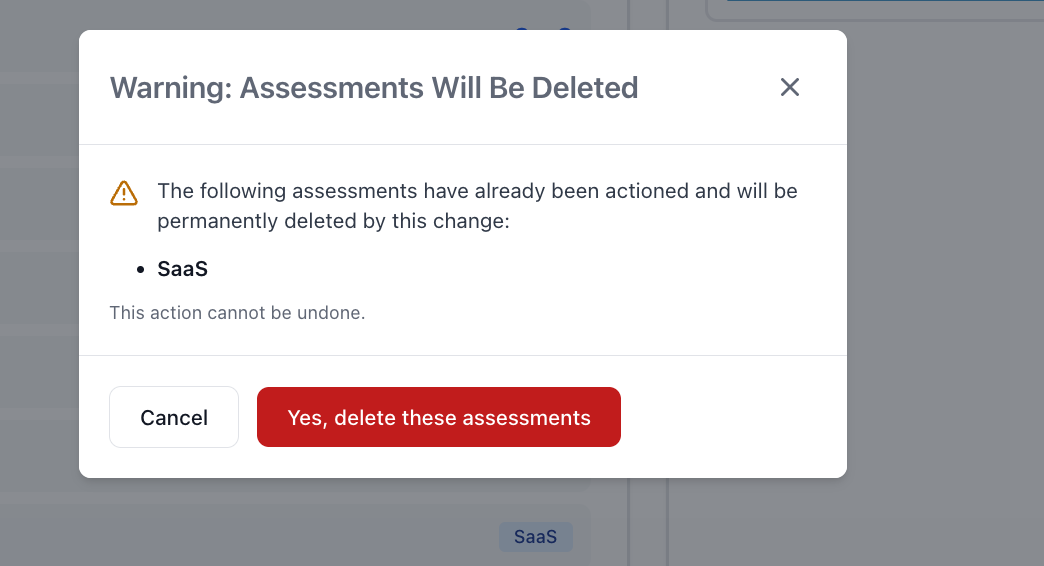
Add it back to re-run
- The Assessment Overview now shows "0 required — Add Assessments". Click "Add Assessments".
- Check the tag again (for example, "SaaS") and click "Update". Docubark creates a fresh assessment on the ticket.
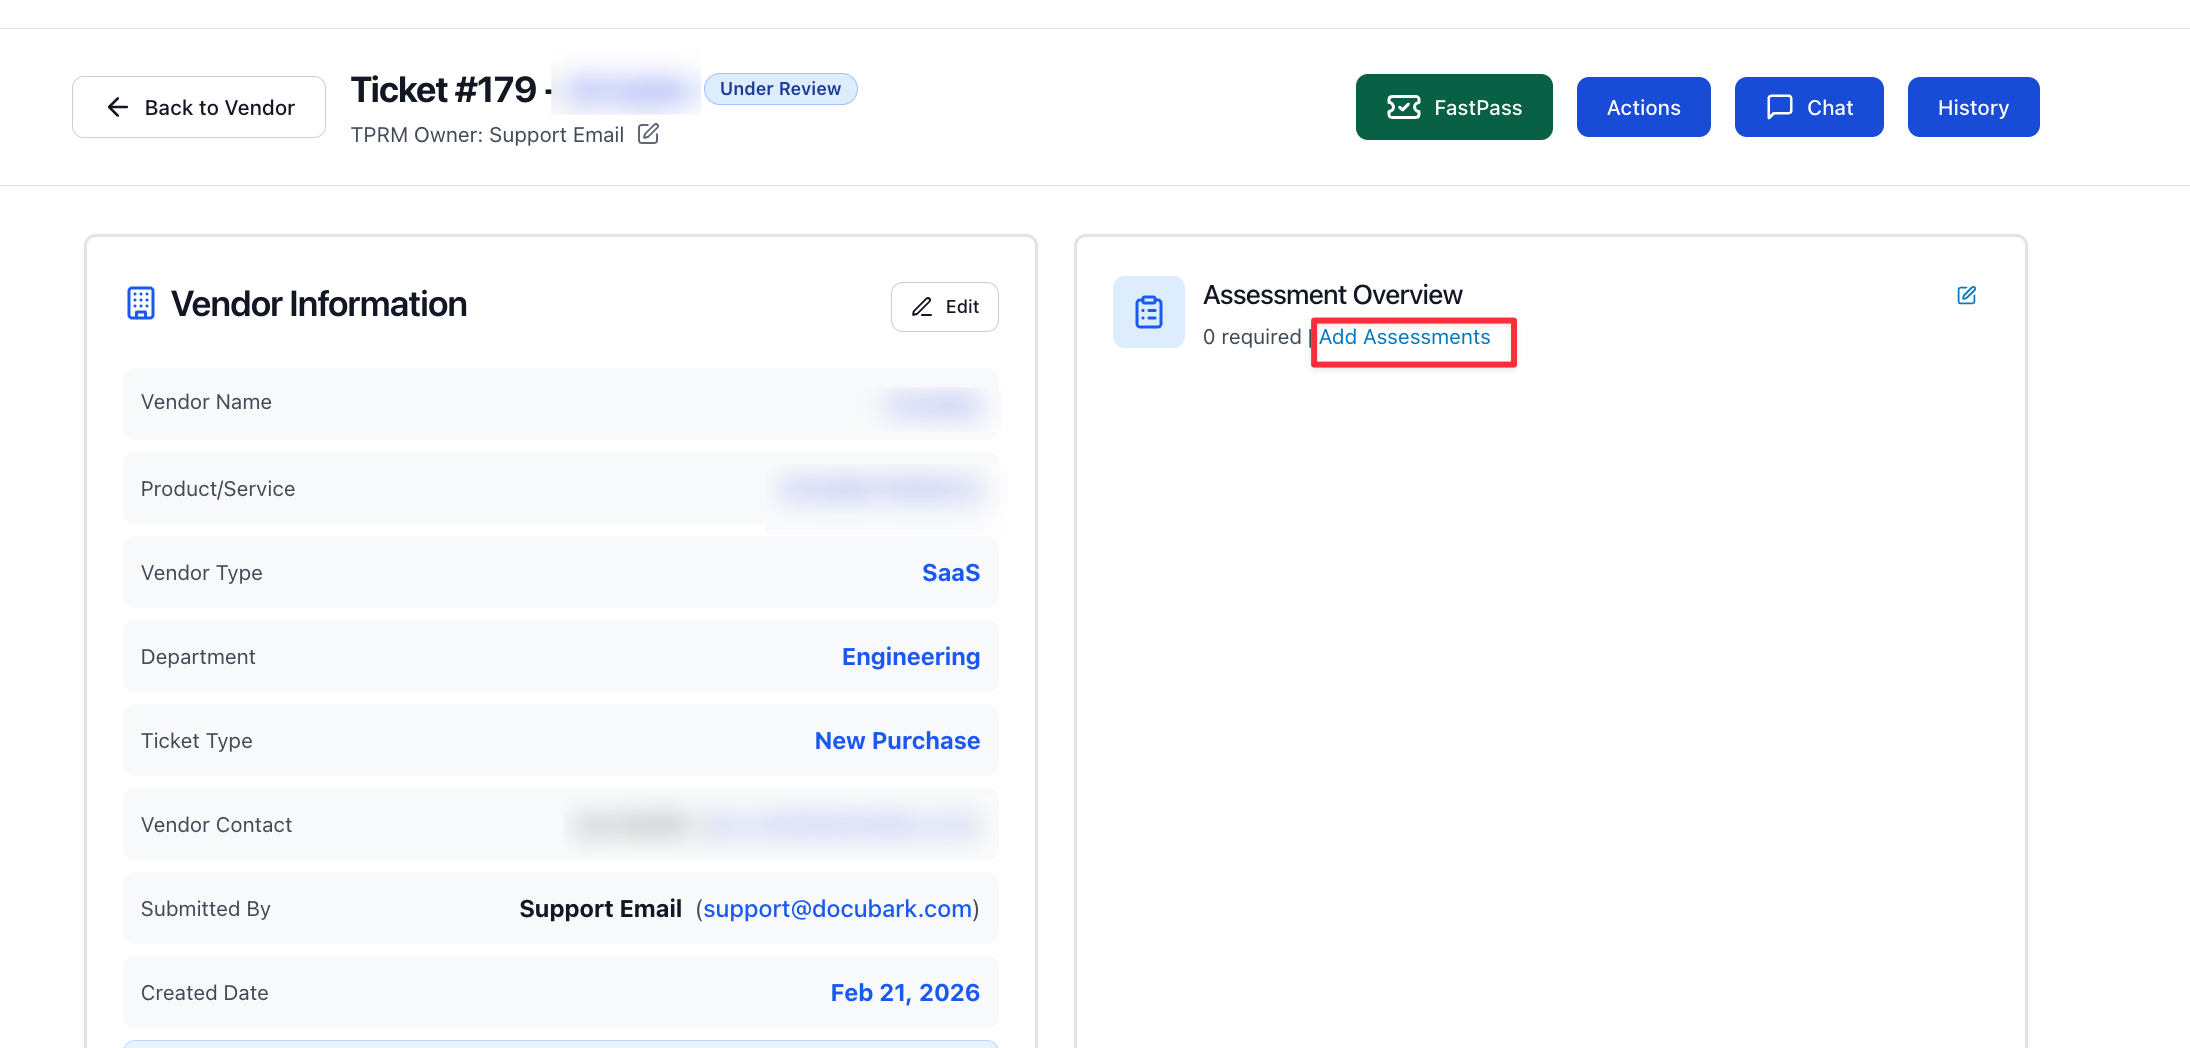
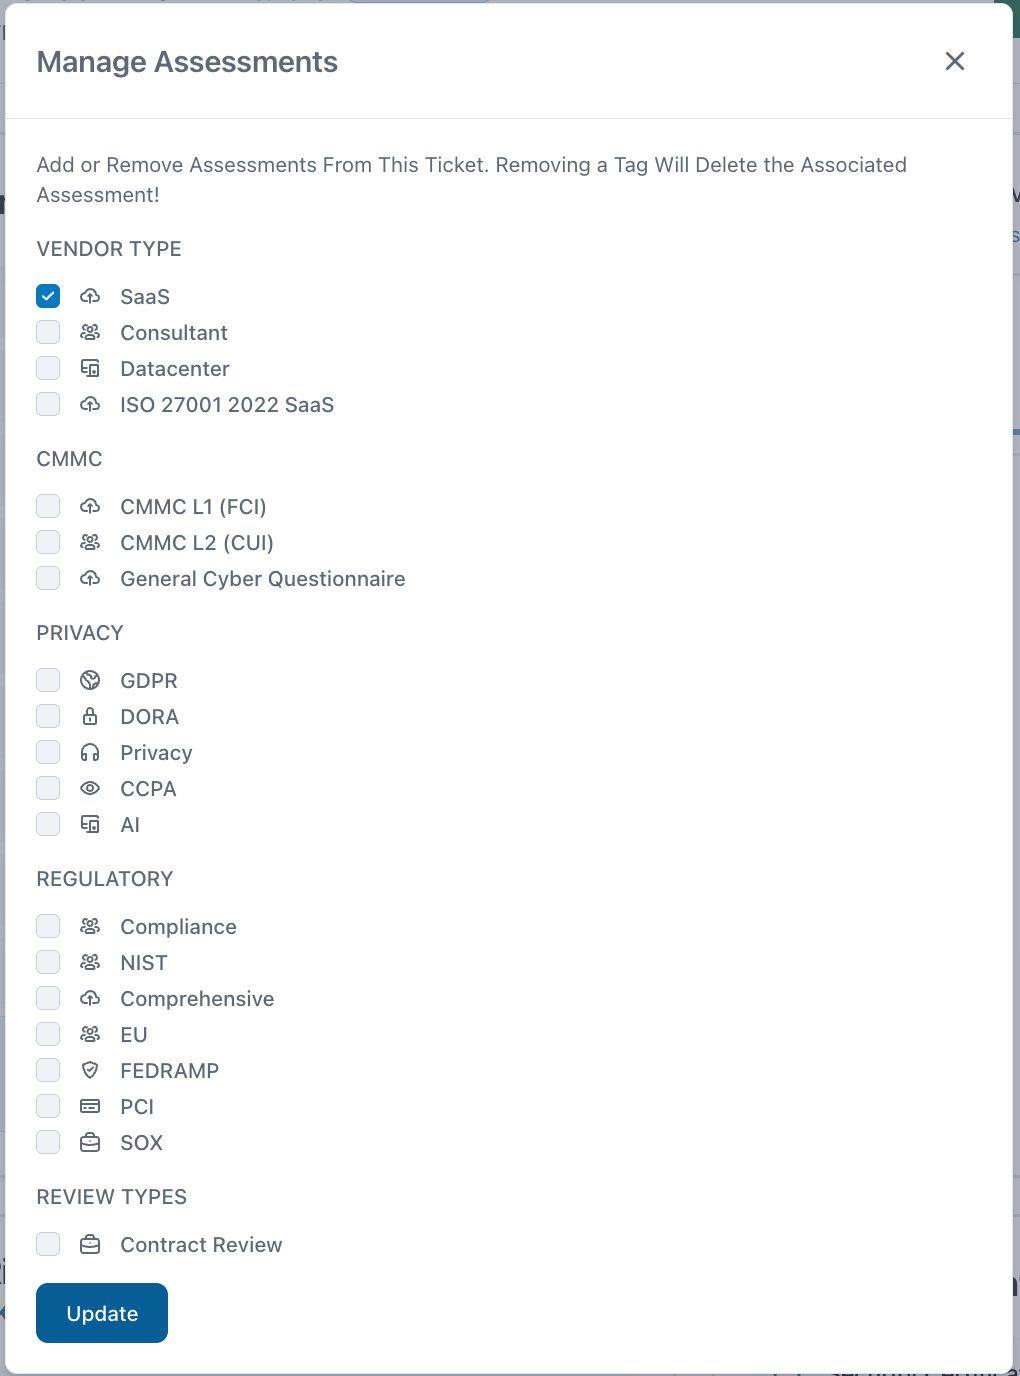
The new assessment starts empty. Run it against the current documents the same way as before — see Running an assessment in a ticket and Completing your questionnaire with vendor documents.
Manually adjusting a vendor's residual risk
Override the calculated residual risk from the ticket's Risk Summary card.
Docubark calculates a vendor's residual risk automatically, but you can override it when you have context the model doesn't. The adjustment lives on the vendor's latest ticket and shows on both the ticket and the vendor profile.
Adjust the residual risk
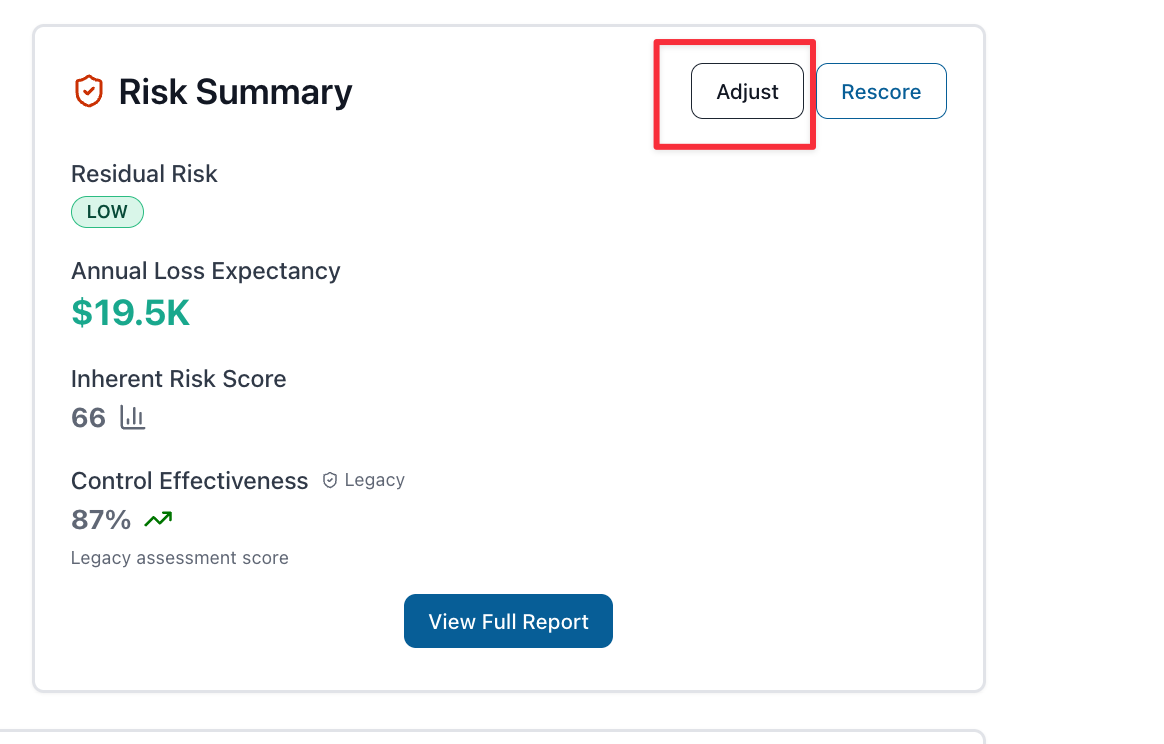
- Open the vendor's latest ticket and scroll down to the Risk Summary card.
- Click "Adjust" (next to "Rescore").
- In the "Adjust Residual Risk" dialog, set the Annual Loss Expectancy and/or the Risk Rating, and enter a reason for the change (required).
- Click Save. Residual Risk and Annual Loss Expectancy now show an "Adjusted" badge.
Manually adjusting the control effectiveness score
Override the combined assessment score that drives control effectiveness.
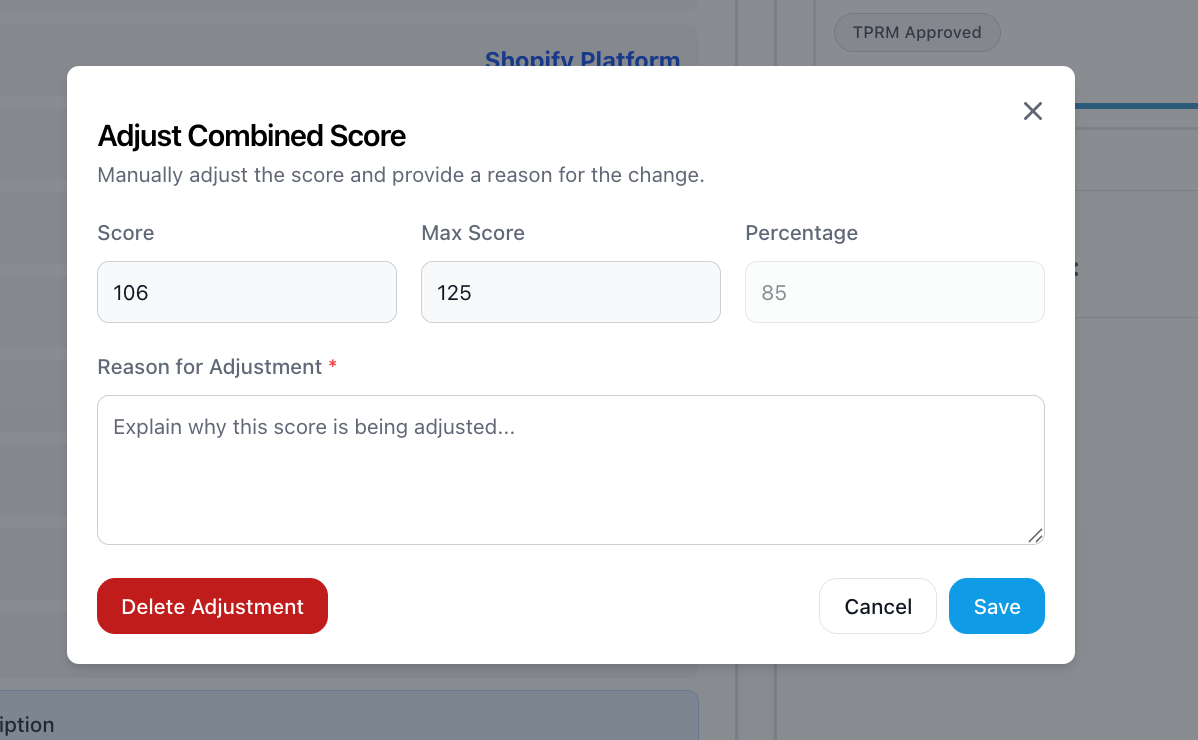
Control effectiveness is the vendor's combined assessment score, shown as a percentage in the Risk Summary. You can override it manually — the value you set becomes the control effectiveness on the ticket and the vendor profile, and feeds residual risk.
Adjust the score
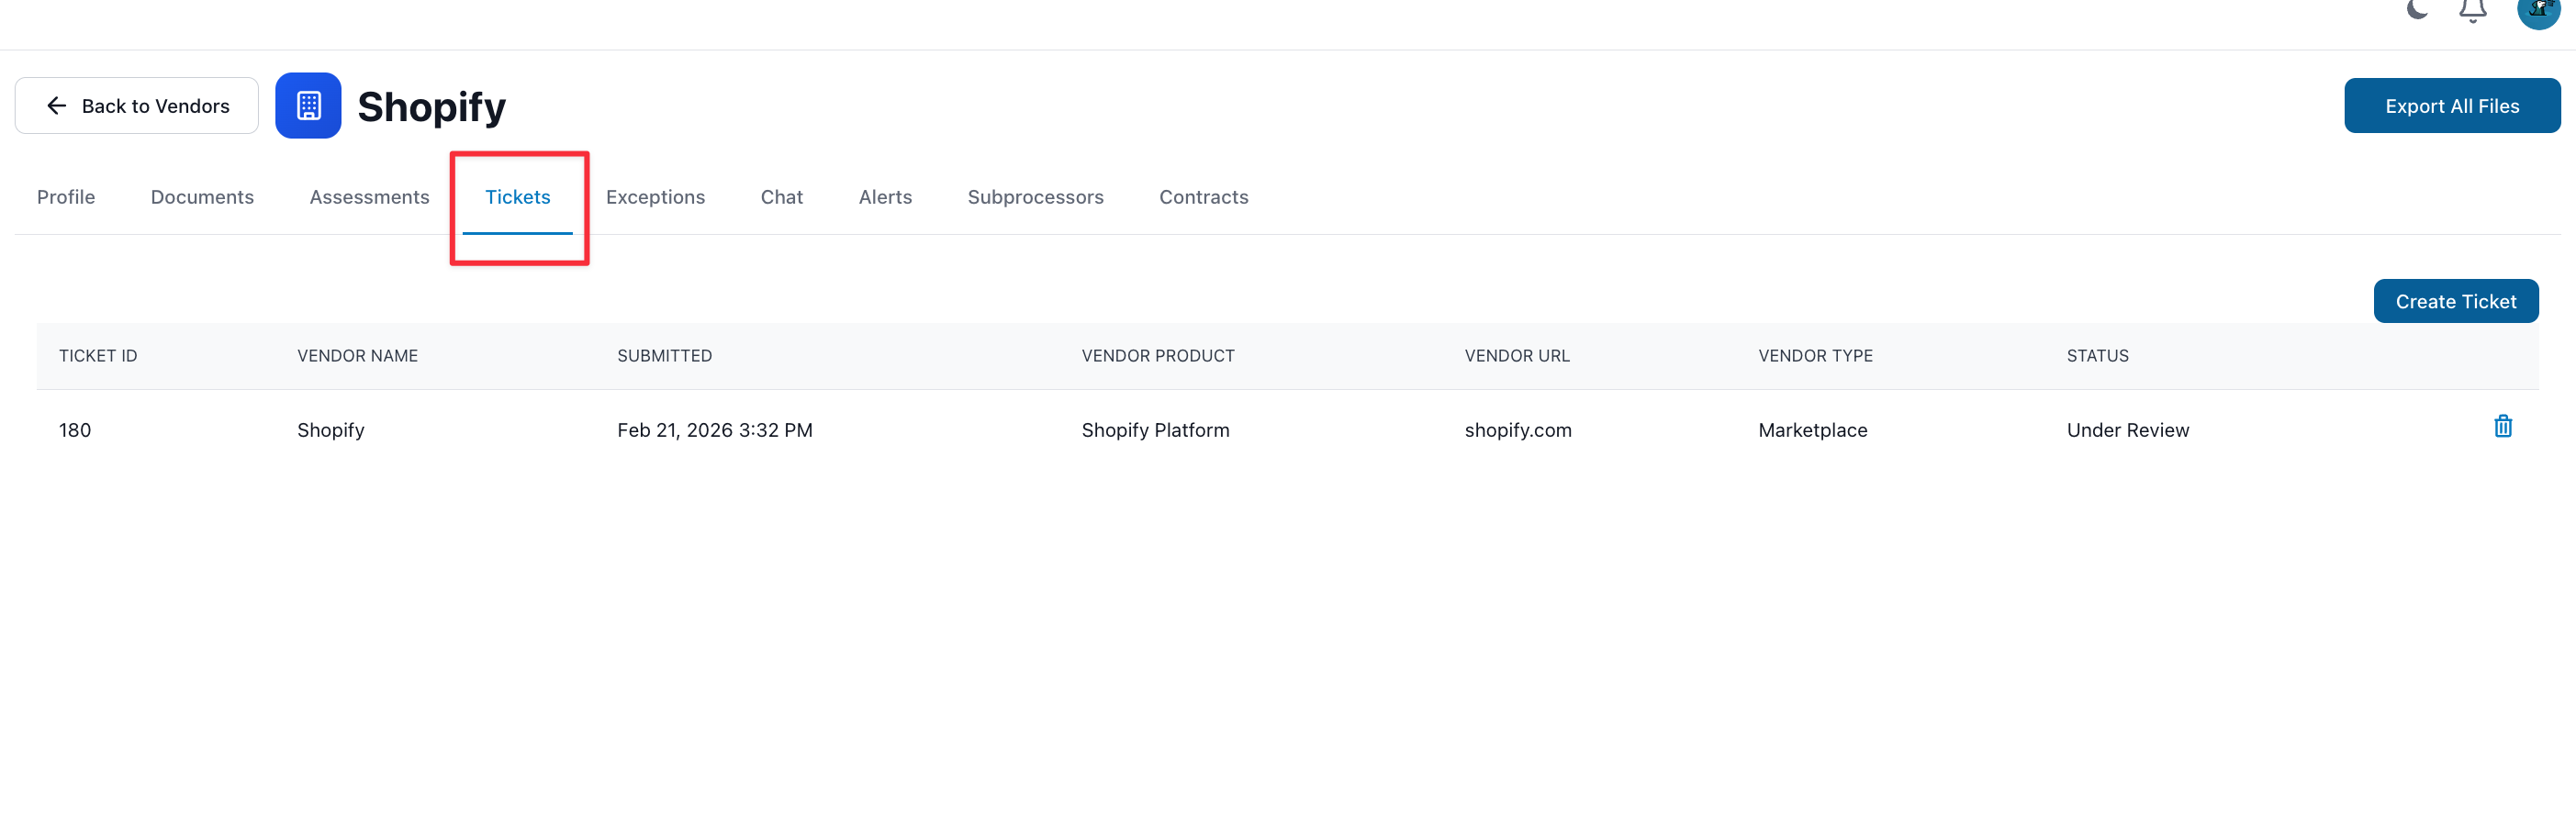
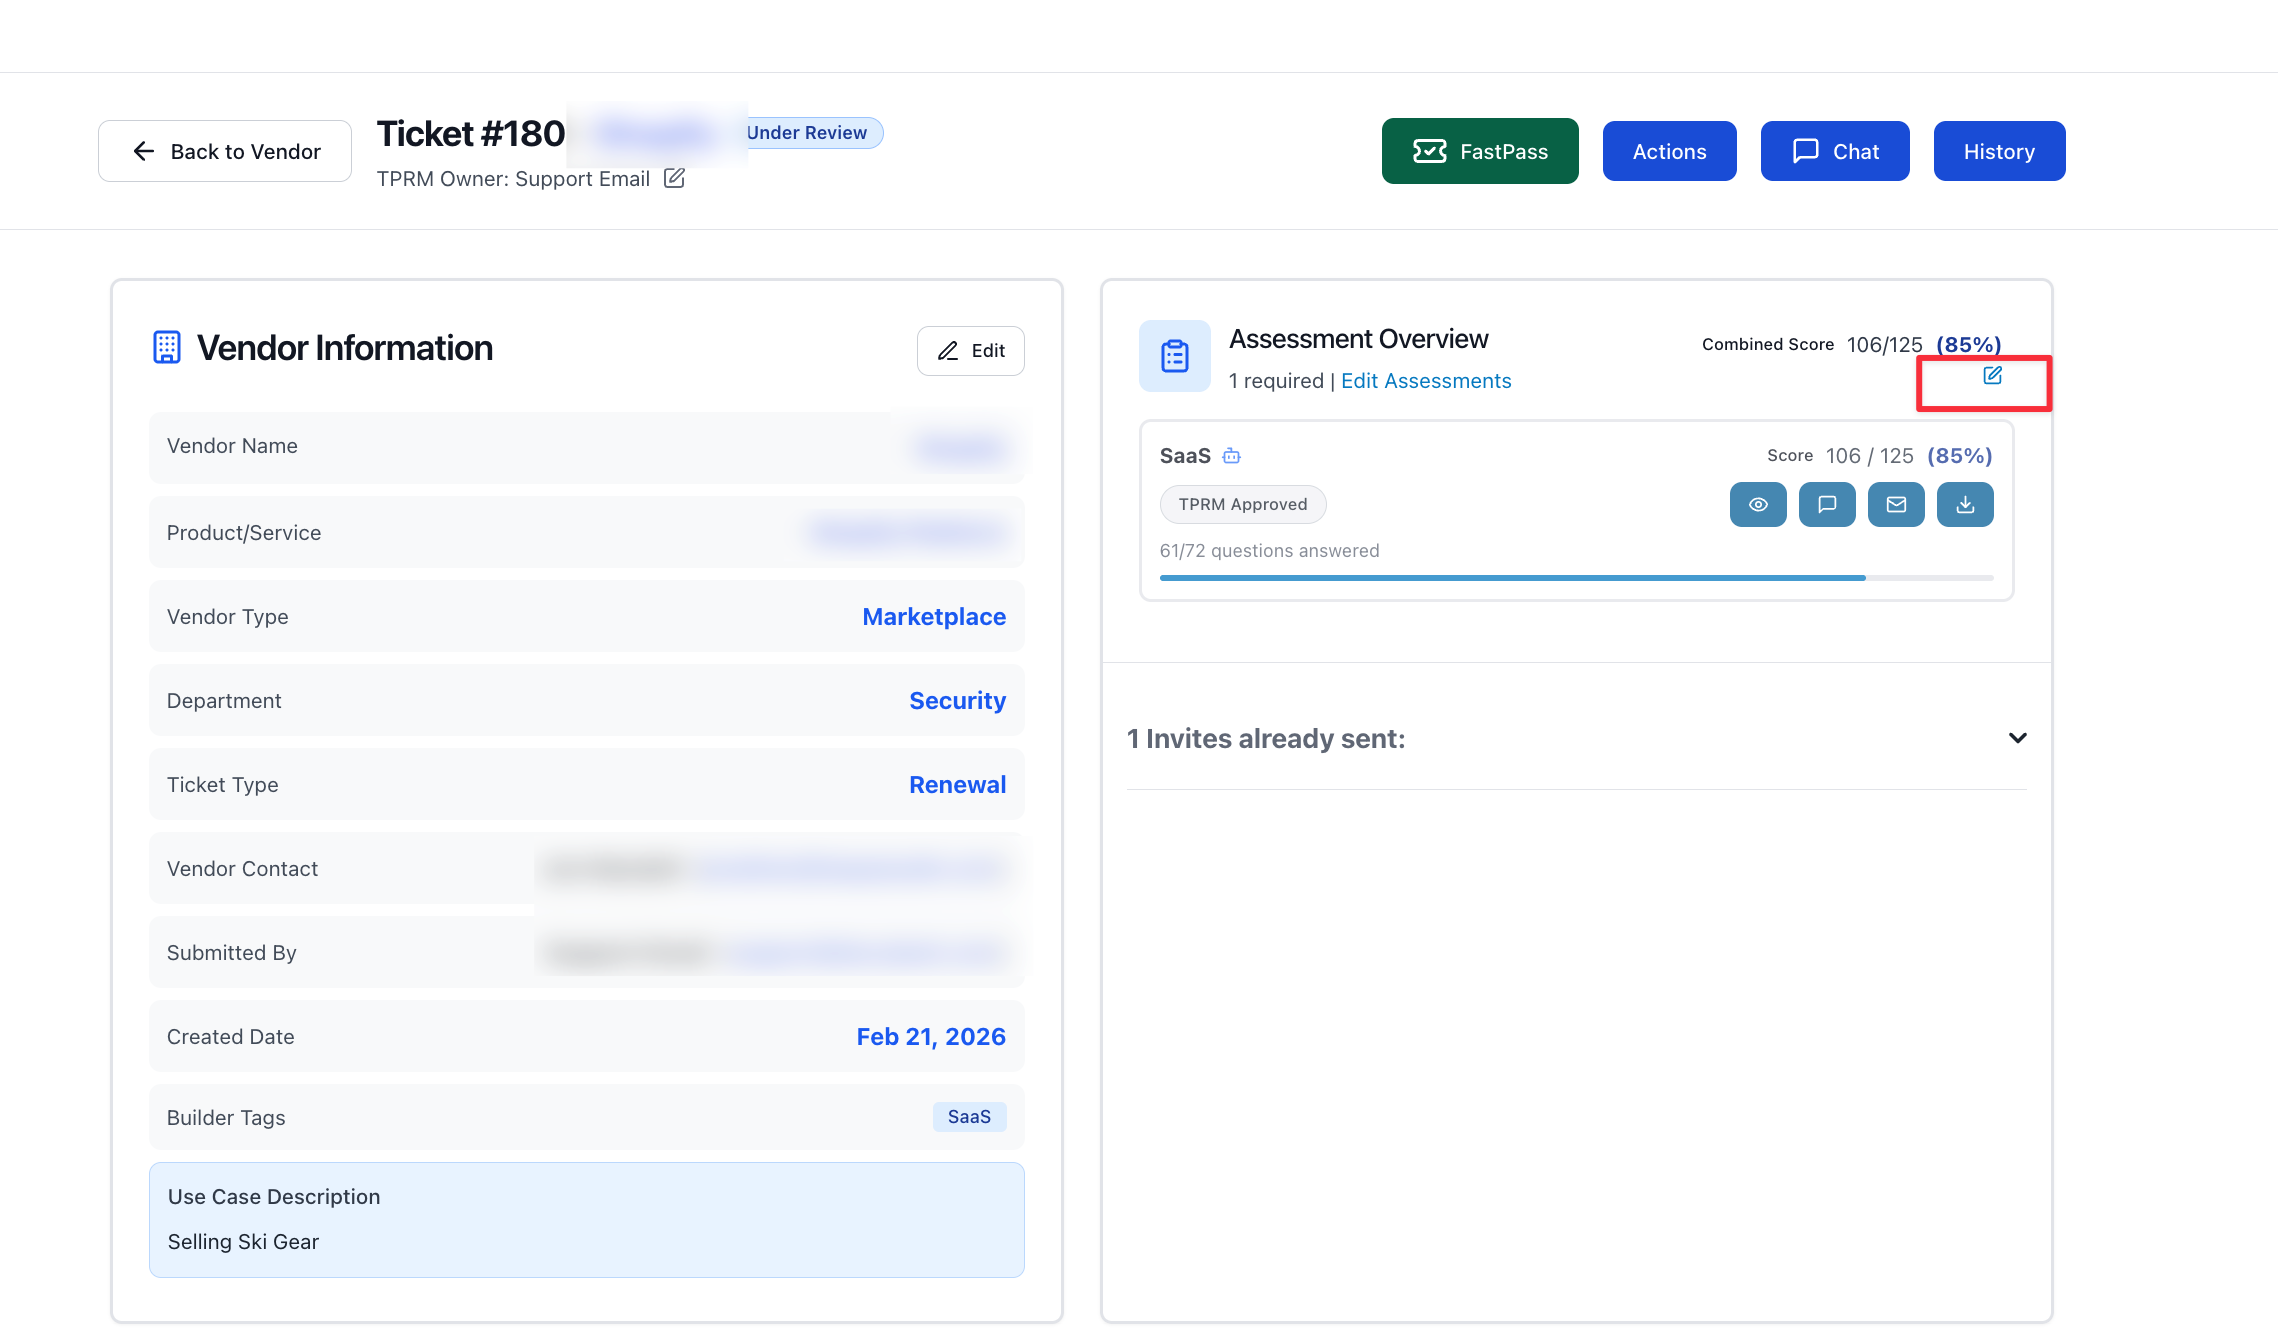
- Open the vendor and go to the Tickets tab, then open the latest ticket.
- In the Assessment Overview card, click the pencil (edit) icon in the top-right.
- In the "Adjust Combined Score" dialog, set the Score and Max Score — the Percentage updates automatically — and enter a reason (required).
- Click Save.
Sending a questionnaire to a vendor
Create an assessment in a ticket and send it to the vendor to complete.
You can send an assessment to a vendor contact so they answer the questions themselves, then track their progress from Docubark.
Send the questionnaire
- Open the ticket and create the assessment you want the vendor to complete (see Running an assessment in a ticket).
- On the ticket page, open the assessment's dropdown menu and select "Send to Vendor".
- In the "Send Assessments to Vendor" dialog, choose the vendor contact and confirm the assessments to send.
- The contact receives an email with a link to answer the questions — no Docubark account required.
Completing your questionnaire with vendor documents
Let Docubark draft the answers from the vendor's documents.
Instead of chasing the vendor, you can have Docubark draft the answers from documents they've already provided — SOC 2 reports, policies, prior questionnaires.
Answer from documents
- Open the vendor and upload the documents on its Files tab.
- Go to the Assessments tab and click "Start Assessment".
- Choose the builder tag and click Continue.
- For Answer Mode, pick "AI Assistant", select the documents to analyze, and click Continue.
- Click "Run Now" — Docubark reads the documents and drafts the answers for you to review.
Using the vendor list (filter, sort, export)
Find, organize, and export your vendors.
The vendor list is your master view of every vendor, with columns for status, risk, and review dates. You can filter, sort, choose columns, and export it.
Filter
- Search by name, product, or URL.
- Filter by vendor type, status, inherent risk, residual risk, review frequency, and next review (upcoming, overdue, or today). Risk filters appear when the matching risk modules are enabled.
Sort and columns
- Click any column header to sort; click again to reverse. Turn on "Keep Sort Permanent" to remember it.
- Use the "Columns" menu to show or hide columns such as Inherent Risk, Residual Risk, Annual Loss, Control Effectiveness, and review dates.
Export
Click "Export (csv)" to download the list as a CSV. The export respects your current filters, so you get exactly the vendors and columns you're looking at.
Importing your vendor list
Bulk-add vendors from a spreadsheet.
Instead of adding vendors one at a time, import them from an Excel file — handy when migrating from a spreadsheet or another tool.
Import vendors
- On the Vendors page, click "Import" → "Import Vendors".
- Download the template and fill it in. The first row must be the headers.
- Required columns are Vendor Name, Vendor Product, Vendor URL, and Vendor Status (Department is optional).
- Pick the vendor type to apply, drag in your .xlsx or .xls file (up to 10MB), and upload.
Ludicrous Mode
Turn on "Ludicrous Mode" to have AI enrich each vendor from a web search before import — then you only need the Vendor Name (up to 200 vendors per upload). You can also set one ticket type to apply to all of them.
Risk Settings
Data Volume
Group vendors by how much data they process, and score each level.
Data Volume classifies a vendor by how much data it processes — the more records a vendor handles, the greater the potential impact if something goes wrong. Each volume level carries a risk score that feeds your inherent risk calculation.
How it works
You define volume levels (for example Low, Medium, and High) as record-count ranges. During vendor intake, the vendor is matched to a level based on how much data they handle.
- Category name — e.g. "Small scale" or "Enterprise"
- Record range — a minimum and an optional maximum (leave the max blank for open-ended, e.g. 100,000+ records)
- Risk score (0–100) — how much this volume level contributes to inherent risk
- A color, and optionally builder tags that auto-apply when this level is selected
Why it matters
A breach at a vendor holding millions of records is far more damaging than one holding a handful. Scoring volume lets Docubark weight high-volume vendors appropriately. Configure it under Risk Settings → Data Volume.
Data Classification
Define the types of data a vendor handles and how sensitive each is.
Data Classification defines the types of data a vendor handles — and how sensitive each type is. Sensitivity is usually the single biggest driver of vendor risk, so this feeds directly into the "data sensitivity" part of your inherent risk score.
How it works
You create a ranked list of classifications (for example Public, Internal, Confidential, PII), ordered from least to most sensitive. During intake a vendor may handle several types — Docubark uses the highest-scoring classification selected as the data sensitivity score, so handling even one highly sensitive type raises the risk regardless of what else is present.
- Classification name and description
- Risk level — low, medium, or high (color-coded)
- Risk score (0–100)
- Order (least to most sensitive), an optional PII flag, and optional builder tags
Why it matters
Sensitive data — PII, financial, health, source code — carries regulatory and reputational weight (GDPR, HIPAA, and the like). Classifying it lets Docubark apply the right scrutiny and controls to the vendors that touch it. Configure it under Risk Settings → Data Classification.
Inherent Risk
The baseline risk of a vendor before controls — and how it's scored.
Inherent risk is a vendor's baseline risk before any controls are considered — how much damage they could do based on the data and access they have. It's the anchor the rest of Docubark's risk model is built on.
How the score is calculated
Docubark combines three weighted factors into a single 0–100 score:
- Data sensitivity — from your data classification (highest selected score)
- Data volume — from your data volume levels
- Business impact — from your unavailability impact levels
Each factor is multiplied by a weight you set, and the weights must add up to 100%: (data sensitivity × its weight) + (data volume × its weight) + (business impact × its weight).
Configuring it
- Under Risk Settings → Inherent Risk, set the weight for each factor so they total 100%.
- Define your risk-level tiers (e.g. Low / Medium / High) with score ranges, a color, a risk factor (a multiplier used downstream), and a review frequency.
- Optionally attach builder tags to a tier so they auto-apply during intake.
What it drives
- Review cadence — each tier sets how often the vendor is reassessed (e.g. annually, every 3 years, or upon incident)
- Assessment scope — a tier's builder tags decide which assessments and questions apply
- It's the starting point for residual risk and FAIR modeling
Residual Risk
The risk that remains after a vendor's controls are taken into account.
Residual risk is what's left after a vendor's controls reduce their inherent risk. Where inherent risk asks "how bad could this be," residual risk asks "how bad is it likely to be, given how well this vendor actually protects itself."
How it works
Docubark takes inherent risk as the baseline, then applies the vendor's control effectiveness — a 0–100% score derived from their assessment answers (and any manual adjustments). Controls reduce how often a loss is likely to occur, producing a residual risk level and an Annual Loss Expectancy (ALE) — roughly, what this vendor could cost you in a typical year. The flow is: Inherent Risk → Controls → Residual Risk.
Configuring it
- Expected incident cost — the baseline dollar cost of a typical security incident for your organization
- Vulnerability modifier — a flat factor (default 0.05, i.e. 5%) that scales raw vulnerability so the implied breach probability matches published industry data
- Risk-level tiers — dollar (ALE) ranges with colors and score ranges
Why it matters
Two vendors with the same inherent risk can carry very different residual risk depending on their controls. Expressed in dollars via FAIR modeling, residual risk is what lets you compare vendors on a common, business-friendly scale. Configure it under Risk Settings → Residual Risk.
FAIR Modeling
How Docubark turns risk scores into a dollar figure using the FAIR model.
FAIR (Factor Analysis of Information Risk) is the quantitative model Docubark uses to translate assessment scores into a dollar figure. It's how a vendor's residual risk becomes an Annual Loss Expectancy you can put in front of a CFO or board.
The core equation
Risk = Loss Event Frequency × Loss Magnitude. In plain terms: how often a loss is likely to happen, multiplied by how much it would cost — giving an annualized dollar figure (the ALE).
Loss Event Frequency — how often
- Threat Event Frequency (TEF) — the baseline rate of credible attacks per year, driven by the vendor's inherent risk
- Vulnerability — the percentage of those attacks that would actually succeed: (100% − control effectiveness) × the vulnerability modifier. Better controls mean lower vulnerability
- Loss Event Frequency (LEF) = TEF × Vulnerability. Controls reduce how often losses happen, not how much they cost
Loss Magnitude — how much
- Primary loss — your configured expected incident cost (the base impact)
- Risk factor — a multiplier from the vendor's inherent-risk tier; higher inherent risk amplifies the cost of a single loss
- Total Loss Magnitude = primary loss × risk factor
Putting it together
Annual Loss Expectancy (ALE) = LEF × Loss Magnitude. That single dollar figure is what Docubark plots and reports, so you can prioritize by real financial exposure rather than color-coded guesses.
Monitoring & Oversight
Subprocessors on a vendor profile
See a vendor's subprocessors, auto-gathered from public data.
The Subprocessors tab on a vendor profile lists the fourth parties that vendor relies on — its own subprocessors. Docubark gathers this automatically from publicly available data, so you can see a vendor's supply chain without chasing it down.
How it's generated
- Docubark pulls the subprocessor list from public sources and caches it; it refreshes on first load and can be re-run.
- Each entry shows the subprocessor's name and its country of processing, plus when the list was last refreshed.
- If nothing can be found publicly, you'll see a note that a list couldn't be gathered.
Cross-check against a document
You can also upload one of the vendor's documents and have AI check it against the tracked list — it flags which listed subprocessors it found (with the page and a supporting quote), plus any new ones in the document that aren't tracked yet.
The Subprocessors page
A cross-vendor view of your fourth-party exposure.
The Subprocessors page rolls up subprocessors across all of your vendors into one place — a fourth-party map of who your vendors depend on.
What it shows
It aggregates the subprocessor lists gathered on each vendor profile, so you can spot concentration risk — for example, many of your vendors relying on the same underlying provider — at a glance.
Monitoring Alerts
Continuous breach and fraud news tied to your vendors.
Monitoring Alerts surface recent breach and fraud news about your vendors, so a problem at a third party reaches you without you going looking for it.
How they're generated
- A daily run scans the news for breach and fraud coverage published in the last 24 hours and matches it to your vendors.
- Each alert is tagged Breach (red) or Fraud (yellow), with a title, summary, the article date, when it was detected, and a link to the source.
Managing alerts
Alerts appear both under Monitoring Alerts (team-wide) and on the vendor's own Alerts tab. Dismiss one you've handled or that isn't relevant, optionally noting why — for example duplicate coverage or a false positive.
Exceptions
Document an accepted risk on an assessment and track it to closure.
An exception is a documented decision to accept a gap or risk rather than remediate it right now. You raise it on a specific assessment answer, and Docubark tracks it until it's closed.
Raising an exception
- In an assessment, open the exception control on the question you want to flag.
- Choose a risk level — Low, Medium, High, or Critical — and add an optional comment.
- Save. The exception records an allowed window (default 90 days) and a target close date.
Where exceptions live
- On the vendor's Exceptions tab — with days open, allowed days, target close, risk level, status, and the related assessment, control, and question. You can edit the allowed days, risk level, and Open/Closed status inline.
- On the Exceptions page — every exception across all vendors, with filters for days open, allowed days, risk level, and status.
Document expirations
Track when vendor documents expire and see what's coming due.
Vendor documents — SOC 2 reports, certificates, insurance — expire. Docubark lets you set an expiration date on any uploaded document and rolls them all up so nothing lapses unnoticed.
Set an expiration on a document
- Open the vendor and go to the Files (Documents) tab.
- In the "Expires at" column, click the date field for the document and pick its expiration date.
- It saves right away.
The Expirations page
The Expirations page lists every document with an expiration across all vendors. A "Days Left" column shifts from gray to yellow to orange to red (and "overdue") as the date nears. Filter by an expiry window — 30, 60, or 90 days, or already expired — or search by vendor or file name.
Administration
Team members & roles
The user roles and what each one can access.
You manage who's on your team and what they can do under Team settings. Docubark has four roles, each with a different level of access.
The roles
- Admin — full access: manage vendors, assessments, settings, and team members. The team owner is the top-level admin (shown as "Admin (Owner)").
- Member — day-to-day TPRM work: vendors, assessments, intake, and reports.
- Business Owner — a limited requester view: submit new vendor requests, track their own requests, and browse approved vendors. See the Business Owner view.
- SME — subject matter experts who answer the assessment areas assigned to their SME group.
Inviting people
- Under Team settings, enter the person's email, pick a role, and send the invite.
- Invites show as Pending until accepted.
- An admin can change a member's role, or remove them, at any time.
The Business Owner view
What a business owner sees — request, track, and browse approved vendors.
Business Owners are the people requesting new vendors, not running the TPRM program, so their view is intentionally simple — three things.
What a Business Owner can do
- New Request — open the intake form to request a new vendor for review.
- My Requests — track the status of requests they've submitted, including whether approval is needed, approved, or rejected.
- Approved Vendors — browse the vendors the company has already approved, so they can reuse an approved tool instead of requesting a duplicate.
Ticket configuration
Set up ticket types, departments, SLAs, and labels.
Ticket configuration (under Ticket Settings) controls how assessment tickets are classified and paced — where you tailor the workflow to your program.
What you can configure
- Ticket types — the categories of work (for example New vendor or Reassessment), each with a name and optional description.
- Departments — the business units you can assign tickets to.
- SLAs — target turnaround in days for the whole ticket, for SMEs, and for vendors.
- Section labels — rename the "Notes & Comments" section to match your team's language.
Require an acknowledgement on a ticket type
Make submitters confirm a statement before they can open a ticket of a given type.
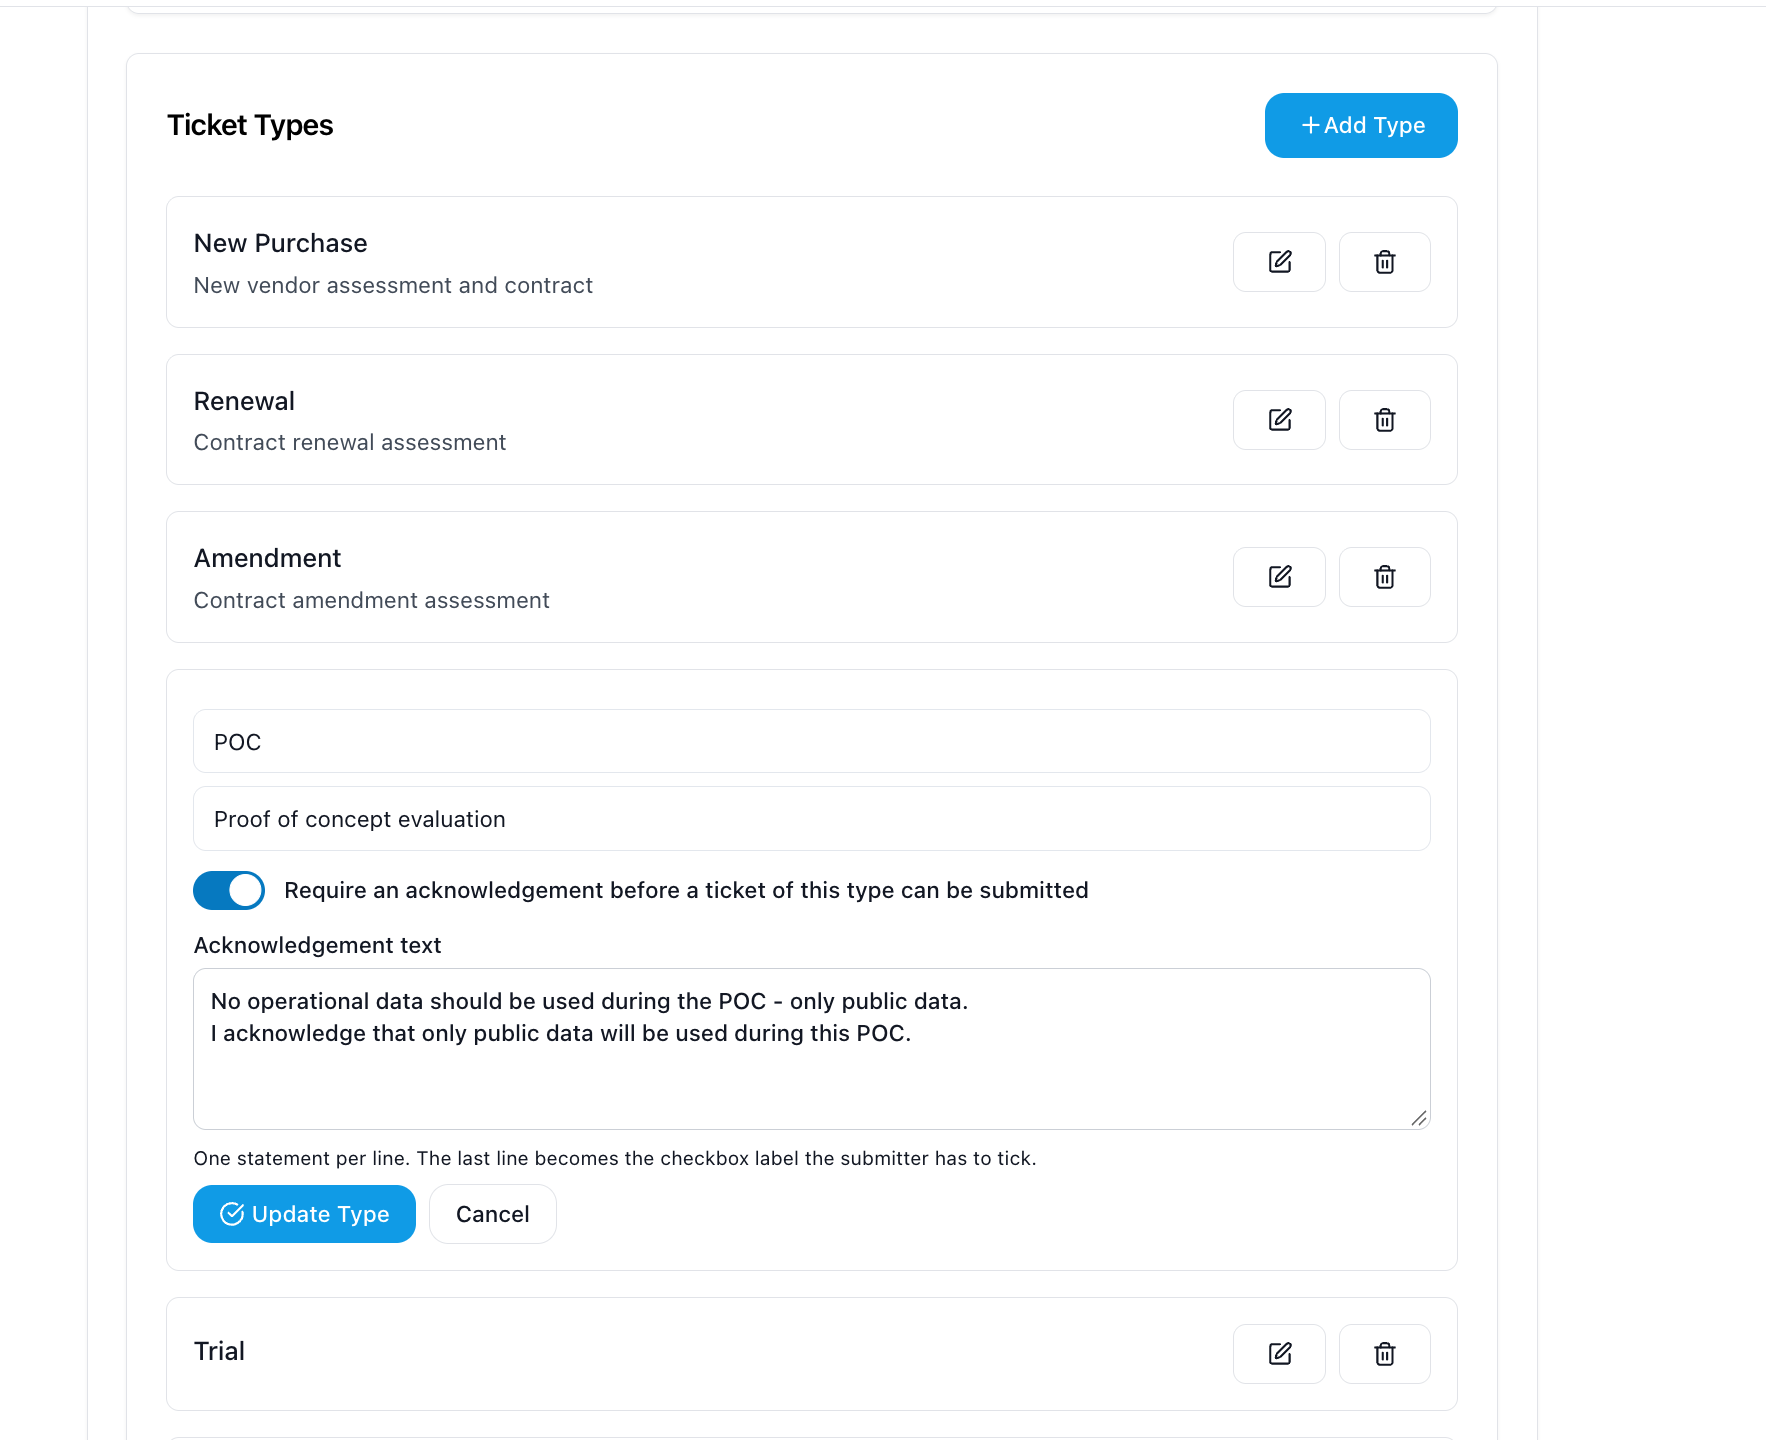
Any ticket type can require the submitter to acknowledge a statement before the ticket can be submitted. It is handy when a kind of request carries a condition, for example a proof of concept (POC) where only public data may be used.
Turn it on
- Go to Ticket Settings and open Ticket Types (see Ticket configuration).
- Click the edit (pencil) icon on the ticket type you want, for example POC.
- Switch on "Require an acknowledgement before a ticket of this type can be submitted".
- Enter your acknowledgement text, one statement per line. The last line becomes the checkbox label the submitter has to tick.
- Click "Update Type" to save.
The intake form
Build the form requesters use to submit vendors — including the inherent-risk inputs.
The intake form is the questionnaire a requester fills out to submit a vendor. It collects the basics, any custom questions you add, and the inputs that drive inherent risk. You share it as a link, and each submission becomes an intake ticket.
What the form collects
- Basic info — vendor name, URL, product, vendor type, use case, ticket type, and department, plus the submitter's and vendor contact's details.
- Custom questions — add your own (text, URL, select, multi-select, or long answer), mark them required, allow document attachments, or let AI help answer them.
Inherent risk inputs
The form also gathers the three inputs behind a vendor's inherent risk score:
- Data classification — which types of data the vendor will handle (select all that apply); the most sensitive selection drives the score. See Data Classification.
- Data volume — how many records, chosen on a Low-to-High slider. See Data Volume.
- Unavailability impact — the business impact if the vendor goes down. See Unavailability Impact.
Each answer feeds the weighted inherent-risk calculation, and selections can auto-apply builder tags to the resulting ticket.
Setting up webhooks
Send Docubark notifications to Slack, Mattermost, Discord, or any incoming webhook.
Webhooks let Docubark post a message to an outside service whenever certain events happen — a vendor finishes an assessment, a monitoring alert fires, a contract is about to expire, and more. They work with Slack, Mattermost, Discord, or any tool that accepts an incoming webhook URL, so your team gets notified in the channels you already use.
Open the Webhooks tab
- Open Team settings — click your avatar in the top-right and choose "Settings", or click "Team Settings" in the left sidebar. Both open the same page.
- Select the "Webhooks" tab (it's separate from the "Integrations" tab).
- You'll see one URL field for each event type.
Add a webhook URL
- In Slack, Mattermost, Discord (or whichever tool you use), create an incoming webhook and copy its URL — it looks like https://hooks.slack.com/services/... In Slack, follow Slack's guide to incoming webhooks.
- Back in Docubark, paste that URL into the field for the event you want to send.
- That's it — the tab saves automatically as you type, so there's no Save button to click; an autosave indicator confirms the change.
- To turn an event off, clear its field and leave it empty.
Events you can send
Each event has its own field, so you can route different notifications to different channels — or only enable the ones you care about.
| Event | Fires when |
|---|---|
| Intake Form Submitted | Someone submits the business intake form to request a new vendor. |
| Vendor Completed Assessment | A vendor finishes their assessment or questionnaire. |
| SME Approved | A subject matter expert approves their assigned area. |
| Business Owner Approved | A business owner approves a vendor request. |
| Continuous Monitoring Alert | A monitoring alert is raised on one of your vendors. |
| Next Review Date | A vendor reaches its next scheduled review date (time to reassess). |
| Contract Expiration | A vendor contract reaches its expiration date. |
How delivery works
- Docubark sends an HTTP POST with Content-Type: application/json.
- The body carries the message text (formatted so Slack, Mattermost, and Discord all render it, and it can include links), sent from the username "DocuBark".
- Each request times out after 10 seconds.
- Failed deliveries are logged but not retried — so double-check the URL is pasted correctly.
Installing the Docubark MCP server
Connect Docubark to Claude for read-only access to your vendor and assessment data.
The Docubark MCP server lets an AI assistant like Claude read your Docubark data — teams, vendors and their risk scores, assessment templates, completed assessments, and contracts — so you can ask questions in plain language instead of clicking through the app. It is read-only, and the easiest way to install it is as a Claude Desktop extension: no repository, npm, or terminal required.
Step 1 — Create an API key
- Open your API keys in Docubark.
- Create a key and click the copy icon to copy its value. Keep it handy — you'll paste it in a moment.
Step 2 — Install the Claude Desktop extension
- Download docubark.mcpb from the latest release.
- In Claude Desktop, open Settings → Extensions.
- Click "Advanced settings", then "Install Extension…" under Extension Developer.
- Select the docubark.mcpb file you just downloaded.
- When prompted, paste the value from Step 1 into Docubark API Key. The Docubark API URL should read https://api.v2.docubark.com — it's pre-filled, so just leave it as it is.
Step 3 — Ask a question
That's it. Ask Claude about your program — for example, "Which of my vendors have the highest residual risk?" or "Show me vendors with an incomplete assessment." Claude Desktop stores your key as a sensitive value, not in a plaintext config file.
What Claude can access
The server exposes a focused, read-only slice of your data: teams and portfolio stats, vendors with their inherent, residual, and control-effectiveness scores, vendor contacts and evidence-file details, assessment templates and their completed runs (including answers and category scores), and contracts. It only ever reads — it can't change anything in your account.
Jira integration (Vendor Reviews)
Pull vendor-request tickets from Jira into Docubark, and transition them back to Done on approval.
The Jira integration (Beta) links your Jira Service Desk to Docubark. New Vendor Request tickets in Jira can create a vendor intake in Docubark, and when you approve or reject a vendor, Docubark can transition and comment on the Jira ticket. It uses a scoped Atlassian API token on the Atlassian gateway — never a personal login.
What it does
- Pull (Jira → Docubark) — creates a Docubark vendor intake for each matching Jira ticket. Reads Jira and writes only to Docubark.
- Write-backs (Docubark → Jira) — on approve, reject, or cancel, Docubark runs a Jira workflow transition and can comment on the ticket. Off by default.
- Backfill — import already-closed historical tickets as completed vendor records, including their attached documents.
Before you start (Jira side)
- Create a dedicated service account in Jira (for example docubark-integration@yourcompany.com).
- Create an Atlassian API token for that account at id.atlassian.com → Manage account → Security → API tokens.
- Have your Atlassian Cloud ID handy, plus the Project key and Request type you use for vendor requests.
Connect Jira
- In Docubark, go to Team settings → Integrations, find the "Jira — Vendor Reviews" card, and toggle it on.
- Enter the Service account email, API token, and Cloud ID, then your Project key (e.g. ITSD) and Request type (e.g. New Vendor Request). Optionally add a Slack webhook URL to notify your review team when a ticket is pulled in.
- Click "Test connection". On success you'll see "Connected as … Found N vendor ticket(s)" with a few sample tickets.
- Click "Save connection".
Import vendor requests (pull)
Once connected, turn on "Import vendor requests from Jira (pull)". Docubark then pulls matching tickets on a periodic background sync, creating a vendor intake for each. You can also import on demand:
- "Preview import (dry-run)" — see what would be created without writing anything.
- "Import now" — create the vendors. Keep "Import open tickets only" on to skip closed history. Large imports are capped per run, so run again to continue.
- Use "Browse tickets…" (Backfill) to bring in already-closed tickets as completed vendor records — pick at least one ticket state first.
Write back to Jira (optional)
To let Docubark update Jira, enable "Jira write-backs". Then choose what runs when a vendor is approved (for example, transition the ticket to Done) and when one is rejected or canceled — each maps to your Jira workflow transitions, with an optional resolution to set.
Status and disconnecting
- The card shows status: Not connected → Connected — awaiting first sync → Connected — last sync {time} ago (or Error, with the message from Jira).
- Toggles (pull, write-backs, ticket states) save the instant you flip them; the text fields and transition choices need their Save button.
- Use "Remove connection" to disconnect. Vendors already imported stay in Docubark.
Okta integration (Vendor Discovery)
Connect Okta to compare your Okta apps against your vendor list and surface the gaps — daily and read-only.
Okta — Vendor Discovery (Beta) connects your Okta org to Docubark and, once a day, compares the apps in Okta against your vendor list — flagging what's missing on either side. It's read-only: it uses a dedicated per-team key, and Docubark never sees your Okta admin credentials. Importantly, it does not create vendors for you — the results are a to-do list you act on.
What it does
- Reads your active Okta apps (read-only, using the okta.apps.read scope).
- Matches them to your Docubark vendors — an exact name match first, then an AI match for the rest.
- Surfaces three lists: apps in Okta with no matching vendor, vendors with no matching Okta app, and vendors already matched to an app.
- It does not auto-import anything — you review the results and add vendors yourself.
Before you start
You'll create an Okta "API Services" app and give it read access to your apps. That needs Okta admin access on the Okta side, and a Docubark team-admin role on the Docubark side.
Connect Okta
- In Docubark, go to Team settings → Integrations and find the "Okta — Vendor Discovery" card, then toggle it on.
- Click "Generate public key". Docubark creates a dedicated RSA key pair for your team and shows the public key as a JWK — the private key never leaves Docubark. Copy the JWK.
- In your Okta Admin Console, go to Applications → Create App Integration and choose API Services. Grant it the okta.apps.read scope and upload the JWK under the app's Public Keys.
- Assign a read-only admin role to that app, then copy its Client ID. Okta requires the app to hold an admin role — not just the scope — to read your apps.
- Disable DPoP on the Okta app: Applications → your API Services app → General Settings → uncheck "Require Demonstrating Proof of Possession (DPoP) header in token requests" → save. Leaving it on makes the connection test fail.
- Back in Docubark, enter your Okta Client ID and Okta org URL (e.g. https://your-company.okta.com), then click "Save connection".
- Click "Test connection". You should see "Connection successful." If it fails, the error says what to fix — a DPoP error means the previous step wasn't applied.
Seeing the results
The comparison runs on a daily schedule — there's no "sync now" button, so results appear after the next daily run, not instantly. Open the "Okta Integration" page from the left sidebar to see them across three tabs:
- Missing Vendors — Okta apps with no matching Docubark vendor. Add any you want to track (see creating a vendor).
- Not Found in Okta — Docubark vendors with no matching Okta app.
- Matched — vendors already linked to an Okta app, showing whether the match was Exact, AI, or Manual.
You can Export to Excel for a three-tab report, and the page header shows when it last synced.
Status, security, and disconnecting
- The card's status pill moves through: Not started → Key generated — awaiting Okta setup → Connected (or Error, with the message).
- Docubark stores the private key securely and only ever exposes the public JWK. Access is read-only, and your Okta admin credentials are never shared.
- Use "Regenerate key" to rotate (re-upload the new public key in Okta afterward), or "Remove connection" to stop the daily sync. Removing keeps any matches already found and changes nothing in Okta.
Didn’t find what you needed? Contact support or book a demo.